WPA and TKIP missing after upgrading to Windows 8.1
Update – 2/14/15
Recently someone told me about an EAP-LEAP installation file that came bundled with a RealTek Windows 8.1 wireless driver package. Apparently, all that you need to do is download and install this EAP-LEAP MSI and install it on your Windows 8.1 device. Once this is completed, Windows 8.1 will magically recognize WPA/TKIP and will connect your device to the wireless network! If this doesn’t work, then following the manual steps below. If the MSI works, please leave a comment below letting me know. Thank you and good luck.
Recently I found myself working on installing Microsoft Windows 8.1 Enterprise on a MS Surface (haven’t been able to get a hold of the Surface Pro yet). The installation went smooth enough, however I had a heck of a time getting connected to our corporate wireless network which consists of Cisco Access Points and is configured to use WPA security and TKIP encryption. To my surprise, the Windows 8.1 upgrade seemed to have removed the ability to connect to a WPA/TKIP wireless network. This blog post explains how I was able to get my Surface running Windows 8.1 to successfully connect to a WPA secured wireless network with TKIP encryption.
The first thing I did after installing Window 8.1 was to download and install the latest Intel ProSet Wireless software. I normally download the full set of software instead of just the drivers. As of November 17, 2012, the latest version of the Intel Proset Wireless was 16.5.3. I had to do this when I first installed Windows 8 Enterprise in order to configure the wireless configuration for Cisco LEAP, WPA/TKIP. However, installing the Intel ProSet application did not work for Windows 8.1.
After scouring the Internet for a solution, it became obvious that Microsoft had removed the capability to configure WPA security and its associated types of encryption (i.e. TKIP). While it is true that most of the world has moved on to WPA2 or better, there are still many companies who are Cisco shops that still use WPA/TKIP. While Microsoft removed this functionality from the wireless configuration UI, they apparently had not removed this capability from the operating system. I tried several things such as exporting the wireless configuration to an XML file using NETSH and then manually editing the file to use WPA and TKIP and finaly importing it. Unfortunately I couldn’t get the syntax of the XML exactly right. That was until I found a terrific post explaining how to properly modify the XML file. Below are step-by-step instructions on how to get your MS Surface or any other device running Windows 8.1 to connect to a wireless network running WPA/TKIP.
1. Run Command Line as an Administrator
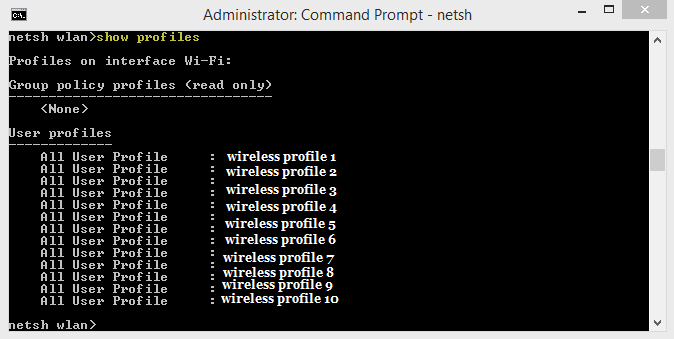
2. >netsh wlan show profiles
3. >delete profile name=”wireless profile x”
4. Right click the connection icon in lower right corner and open Network and Sharing Center
5. Select Set up a new connection or network
6. Select Manually connect to a wireless network
7. Create a profile, and try to get as many details to correspond with your requirement such as the name and select Finish when you are complete. You will be editing the profile immediately afterwards.
8. >netsh wlan show profile <profile name you created in step 7>
without quotes this time. This should show your previous attempt at creating a profile in the GUI dialog boxes. In my case, it had WPA2 and AES but it needed to be WPA and TKIP. I also set my authMode to userOnly.
9. netsh wlan
10. netsh wlan> set profileparameter name=<profilename> authentication=wpa encryption=tkip authMode=userOnly
11. Now click the connection icon, and connect to the network. It should look a little different this time. Hopefully you will be able to connect.
12. netsh wlan> export profile name=<“profile name“>
This will export the profile safely to a file and store it on a network drive or back it up for future use. You can use this profile for any other Windows 8.1 wireless devices you plan on connecting to your corporate wireless network. To import this file use the following command:
netsh wlan add profile filename=”path\profile.xml”
A big Thank You to the person who posted the solution below. Connect with me at Google+!

Thanks a lot man… I tried my best connect to University Wifi from W 8.1 and failed. I wouldn’t have noticed the solution given technet page of microsoft and I almost gave up the efforts to connect. Thanks again. 🙂
No problem, glad it helped! I remember struggling with this for a few hours before getting it to work.
could you upload a video on youtube about that please
Dear Anonymous, I’m not sure a video is needed since everything you need is in this post but if I get some time, I’ll try to post something. If youhave a specific question, maybe I can help you with that. Thank you.
What’s the authentication commmand for WPA-Enterprise?
Alex, although I do not mention it in this post, these instructions were for WPA-Enterprise. Use the following commands to set the security: 1. netsh wlan 2. set profileparameter name= authentication=wpa encryption=tkip authMode=userOnly If you have trouble, please start from scratch (Step 1) and follow the instructions in this post step-by-step. This process is a little finicky and if one typo is made or one step is done out of turn, it won’t work. This is definitely a hack to make those of us with a WPA/TKIP wireless network work with Window 8.1 but it works. Remember, if you get… Read more »
This was a huge help thanks for posting!! Would you happen to know the commands to import the XML onto another PC?
Great question Paul! I should have included that in the original post. I’ll add it. Here is the command to import the XML: netsh wlan add profile filename=”path\fil.xml”
Thanksman
I tried all of the above and when importing the XML file it says “Error 0x4000A: 802.1x disabled when its required to be enabled”.
All I did was export my current profile (wpa2) and changed all the settings you mentioned to WPA, TKIP… why isn’t it working? WTF MICROSOFT!!!!
I feel your pain Tony. I originally had trouble doing the same exact thing you tried, which was to modify my existing XML. I could never get the syntax right or was missing something. I had to create the XML from scratch using these instructions, step-by-step. If you do this, it should hopefully work. I’ve run through this process several times, over and over to make sure it wasn’t a fluke. Like I’ve stated before, this is definitely a hack, but it works. No clue why Microsoft removed this from the WLAN config. Let us know how you did and… Read more »
I had the a exact same error message. It took me a while to figure out, that the new profile (in step 7) can’t be of wpa2 type. A 802.1X or WEP profile worked just fine.
Good point Stephan. I should have mentioned that in Step 7. I do mention to create a WPA profile on step 10. I will revise my post when I get a chance. Thank you for your comments.
10. netsh wlan> set profileparameter name= authentication=wpa encryption=tkip authMode=userOnly
11. netsh wlan> set profileparameter
What is that second “set profileparameter” for? Is it necessary?
David, the second “set profileparameter” is not needed. I just made a mistake. Good catch. I will update the post. I hope the instructions helped you.
I have tried many times but I still stuck in step 11
Can you teach me how to work it ?
Sorry is step 10
Min, what happens when you try? Remember, this is very touchy. If you are having a problem, please start from scratch. Delete any wireless profiles and start again. I’m removing Step 11 (netsh wlan> set profileparameter) because it is not needed. Good luck and please let me know if you have any further questions. Thank you!
I had done all the step but in my wireless properties there yet can choose WPA. I cant figure out what the problem
hi,
When i tape : set profileparameter name= authentication=wpa i get this error :
“Error 0x4000A: 802.1x disabled when its required to be enabled”.
Anonymous, I must admit, I have never experienced this error. It sounds to me that your wireless radio might be disabled or turned off. Try typing the following command: netsh wlan show drivers. You will receive information similar to below. Look for the line “Radio Types Supported”. This will at least tell you what drivers your wireless card has installed and is supported. Interface name: Wi-Fi Driver : 2×2 11a/b/g/n Wireless LAN PCI Express Ha Vendor : Broadcom Provider : Broadcom Date : 7/9/2012 Version : 6.30.59.26 INF file : C:\WINDOWS\INF\oem17.inf Files : 4 total C:\WINDOWS\system32\DRIVERS\BCMWL63a.SYS C:\WINDOWS\system32\bcmihvsrv64.dll C:\WINDOWS\system32\bcmihvui64.dll C:\WINDOWS\system32\drivers\vwifibus.sys Type… Read more »
Hi George,
Thank you so much for this tutorial, it helped me to configure some machines I have.
But I am having trouble configuring one with the Wi-Fi of my School, it has WPA-Enterprise TKIP encryption, at that point, everything is ok, but the problem is, it requires to use some a certificate with microsoft smart card auth to connect to it.
Would you be able to help me configuring this?
Sorry Marco, I’m not sure I will be able to help with your issue. You might have to get someone in IT support at your school to help you with this one.
Thank you for this post. But I’m getting back some sort of error that says, ‘The oneX setting in profile “profilename” on interface “Wi-Fi” is not enabled. Know any sort of solution to this? Thanks in advance
Thank you for your post. Unfortunately, I’m not sure what the “oneX” setting you are referring to is. Sorry. Have you tried downloading the MSI? It worked for me on Lenovo tablets running Windows 8.1
Thank you for your instructions
I configured my WLAN configuration with Windows 8 (TKIP/TTLS) and saved it to a file (netsh wlan> export profile name=)
After that I imported this configuration in Windows 8.1 (netsh wlan add profile filename=”path\profile.xml”)
and was able to connect to my WiFi network.
Fantastic! Thanks for commenting Stefan.
It worked 😉 Thanks a lot!
Am getting this message saying: The oneX setting in profile “profilename” on interface “Wi-Fi” is not enabled.
Suzzy, it’s hard for me to figure out your issue without knowing more but have you tried enabling oneX using the command: set profileparameter oneXEnabled=yes. Let me know and good luck.
Hello!! I have the same problem but with Windows 10. WPA and TKIP is missing after upgrading to Windows 10 Home. Can you help me!!
Thanks.
Ana, as far as I know, TKIP will not work in Windows 10. You’ll have to use another encryption protocol. Sorry.
WPA2-Personal and TKIP works with Windows 10, I just managed to do it. However, it can be a little difficult.
I used the same instructions presented here just for wpa2p: set profileparameter name= authentication=wpa2p encryption=tkip
The command finished successfully, but it still used AES! What worked for me was setting only encryption in a separate command afterwards: set profileparameter name= encryption=tkip.
It seems really hacky, but it worked. I don’t know how it is for WPA2-Enterprise. Maybe try using the command with AES first and then set it to TKIP in a separate command.
Felix, I agree completely. The whole process is a little hokie to me. Thanks for your comment!
Hi. After dealing with this issue some days I finally got the solution. I followed the guide step by step many times and always got the Error 0x4000A or that the oneX was disabled. The guide showed here is repeated in any other webs, but no one comes with the complete solution. It’s as esy as create the new profile only with the network name under a 802.1x network (not WEP, not WPA2). type this on your CMD with no quotes in “yournetwork” netsh wlan set profileparameter name=”yournetwork” authentication=wpa encryption=tkip authMode=userOnly If you prefer AES: set profileparameter name=”yournetwork” authentication=wpa encryption=aes… Read more »
Thanks for your comments Juan! This post is definitely older and didn’t work for everyone but it has helped several folks throughout the years. I really appreciate you taking the time to post your experience and hope that it helps many others in the future. Happy Holidays!
How can you see a profile’s encryption type after you have set it. To check the changes have gone though. I don’t have access to the network the device will connect to when it is in range.
Sorry for the delay Anon! If you need to see the encryption setting after you’ve set it, you can use the Windows GUI and navigate to the Wireless Settings and view the profile that way or you can just use the following command: netsh wlan show all. Good luck and thank you for commenting!
When I attempt to change authentication to WPA it says the profile is corrupted.
Travis, sorry for the delayed response. Have you tried deleting the profile and re-creating it? Are you still using Windows 8.1 on this particular laptop?