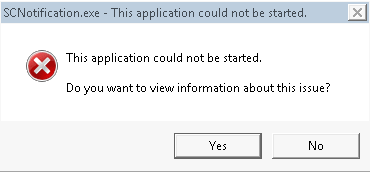
SCNotification.exe–This application could not be started
The dreaded SCNotification.exe error! Everyone who has SCCM implemented in their environment has run into this annoying issue at one time or another. There are several things that can cause this error. The scnotification is the process that notifies users of new advertisements from SCCM. It’s a nice thing to leave turned on if you can avoid this error. A lot of folks just kill the process or prevent it from running via group policy. But I say, why not just deal with the problem and fix it instead of implementing a work-around. This post outlines the steps, in the proper order, that you can use to resolve the scnotification error once and for all.
Fix #1
First and easiest thing to try is to modify the NTFS permissions to the machine.config file. I know, this sound ridiculous but I’ve seen this one little permissions change resolve a couple of weird issues during a Windows 7 rollout with SCCM. On the computer with the scnotification error, navigate to C:\Windows\Microsoft.Net\Framework\v4.0.30319\Config\machine.config. This path will be slightly different depending on whether you are running an x32 or x64 operating system and the version of .Net Framework you have installed.
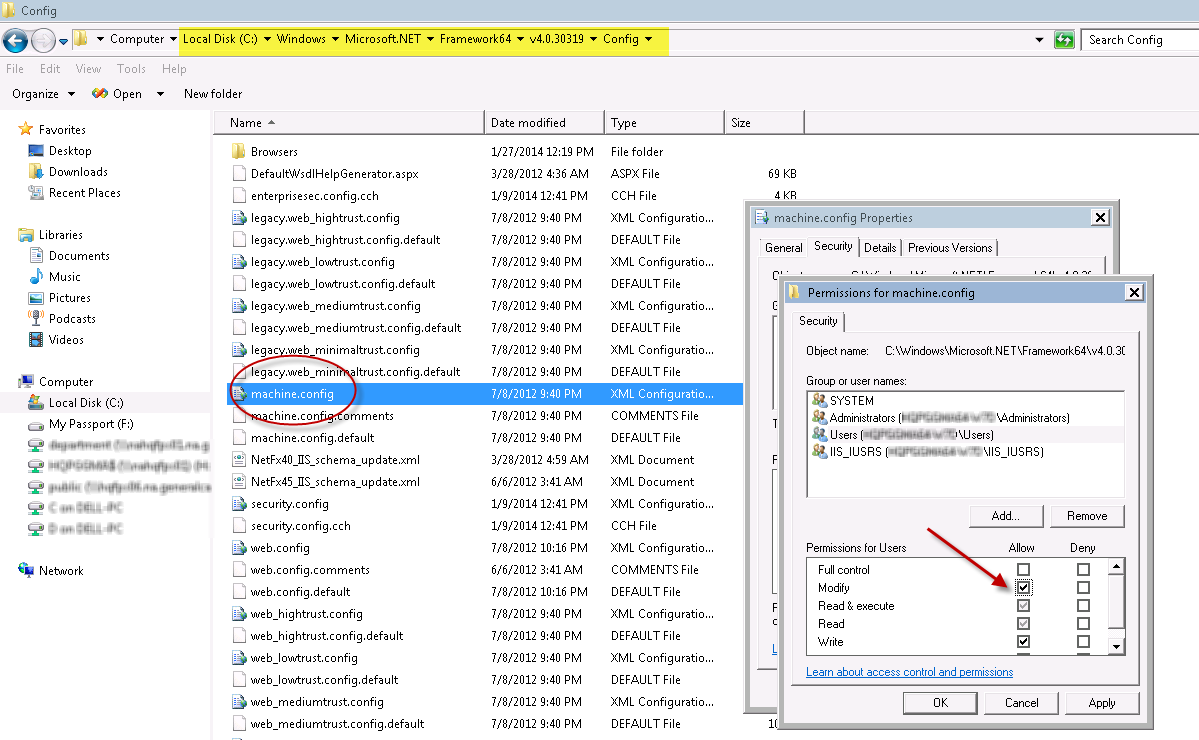
Right-click the machine.config file and grant the local Users group “Modify” permissions. It has “Read Only” permissions by default. If you also have Lenovo computers and use System Update to update the Lenovo drivers, this permissions modifications will resolve an issue opening the System Update application. reboot the computer and then wait a few minutes to see of the error goes away.
Fix #2
If fix #1 doesn’t do the trick, then I’m afraid you will need to uninstall and reinstall .Net Framework. I like to reboot in between the uninstall and reinstall but that may not be necessary. This usually always resolved the issue.
Fix #3
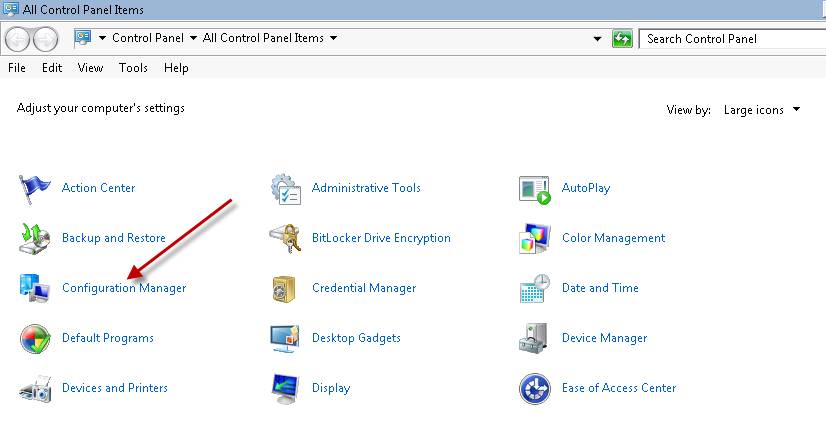
Now if neither one of the above fixes work for you, then we need to get serious and uninstall the SCCM agent completely. You can do this by opening a command prompt as administrator and running ccmsetup.exe /uninstall. This can usually be found in the C:\Windows\CCMSetup folder on the local hard drive of the computer with the scnotification.exe error. This command will uninstall the SCCM agent from the computer. You should reboot afterwards. Once back up, locate the CCM folder and delete it. This folder should be located in C:\Windows\CCM. However, if you have an older SCCM agent or started with an older agent, then you may find this folder located in C:\Windows\System32\CCM. Even though you don’t have to, I would also delete the CCMSetup folder. Verify that the SCCM agent is completely uninstalled by opening Control Panel and verifying that the Configuration Manager icon is gone. Use SCCM to push out the client to the computer again and wait for it to be installed.
One of these fixes should ultimately resolve this dreaded error. However, if this issue is happening to your server farm, then I know it can be a big pain to have to go through all this, especially if this is happening many servers at a time. If that is the case and you do not mind disabling the SCCM software notification bubble, then you can prevent SCNOTIFICATION.EXE from running.
Please use the instructions below to disable the System Center notification process for your servers. Do not disable scnotification.exe for your user workstations. The following was provided by a fellow co-worker. Thanks JD!
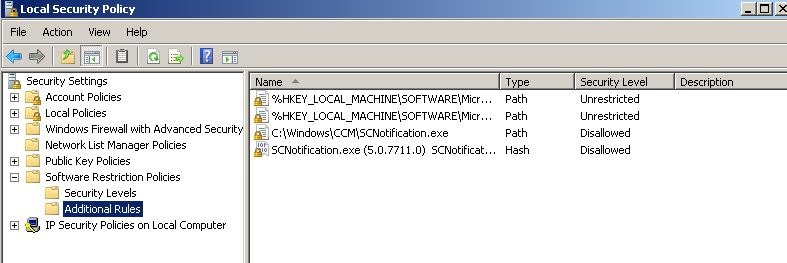
To implement this workaround with a Local Security Policy
Click Start, then Run.
Type secpol.msc, then click OK.
Navigate to Local Computer Policy\Computer Configuration\Windows Settings\Security Settings\Software Restriction Policies\
Right-Click “Software Restriction Policies”; select “New Software Restriction Policies” from the pop-up menu.
Right-Click “Additional Rules”; select “ New Path Rule” from the pop-up menu.
Select “Browse” and browse to SCnotification.exe on the local machine or manually enter the path to ScNotification.exe.
Select “Disallowed”.
Click “OK” .
Right-Click “Additional Rules”; select “ New Hash Rule” from the pop-up menu.
Browse to and select SCnotification.exe on the local machine; hash values will be detected and added to the new rule.
Select “Disallowed”.
Click “OK”.
Close Local Security Policy Editor. It should look something like this:

To implement this workaround with a Domain Security Policy
Open Group Policy Management Editor.
Select the Policy that you want to use to enable the Software Restriction Policies or create a new GPO.
Right-click the policy; select “edit” from the pop-up menu.
Navigate to policyname\\Computer Configuration\Policies\Windows Settings\Security Settings\Software Restriction Policies\
Right-Click “Software Restriction Policies”; select “New Software Restriction Policies” from the pop-up menu.
Right-Click “Additional Rules”; select “ New Path Rule” from the pop-up menu.
Select “Browse” and browse to SCnotification.exe on the local machine or manually enter the path to ScNotification.exe.
Select “Disallowed”.
Click “OK”.
Right-Click “Additional Rules”; select “ New Hash Rule” from the pop-up menu.
Browse to and select SCnotification.exe on the local machine; hash values will be detected and added to the new rule.
Select “Disallowed”.
Click “OK”.
Close Group Policy Management Editor. It should look something like this:
I hope this helps! Share your experiences, leave a comment!
References
Technet Article
Good article. Helpful. Thanks
Thank you for your post! Very happy to hear it was helpful.
Thanks, did not go this deep. However now I have an solution when and if I need one
You’re welcome and thanks for your comments!