Extend the life of your laptop with SSD
There are two kinds of people in this world. There’s the person who leases a car and turns it in every 2 –3 years for the next big thing and then there’s the person who buys a car, pays it off in 4 – 5 years and takes care of it year after year until one day (18 years later), the car just dies of old age as you’re pulling into your driveway. That is the true story of my 1987 Nissan 280SX. It’s the same thing with computers. I know folks who buy a new laptop every 3 years, regardless of whether they really need it. Technology changes so fast, three years is a long time in tech years, they want the newest technology. Then there’s folks like me who expect and demand much more for their money; folks who make a large purchase and expect to keep their computer for 5, 6, 7 or more years. That’s what this post is all about. One of the best things you can do to extend the life of your laptop is to replace the traditional SATA hard disk drive(HDD) with a Solid State drive (SSD).
It has been said that SSD is 4 – 10x faster than HDD. I’m not sure about the exact numbers but there’s no doubt that SSD is much, much faster than HDD. I did my own experiment with my daughter’s 4 year old Dell 1545 Inspiron laptop. She’s had the same laptop since her twelfth birthday. She’s now 16 years old and still using the same laptop. I should mention that I’ve replace the CPU fan, and LCD screen as well as making some cosmetic changes by replacing the front bezel. These were cheap changes that cost about $100 total. Kids these days are not easy on their electronics. I was not about to reward her nonchalant attitude regarding the care of her old laptop by buying her a new one! With that said, she’ll need a new laptop in 2 years when she heads off for college but how do I make this Dell work for her for the next two years? She does a lot of graphic design, Photoshop and some gaming and has been complaining about slowness. I analyzed her hard disk drive and did find a bad sector! It was time to replace the hard drive. I can live with that, after all, it is 4 years old.
I took this opportunity to replace the HDD with an SSD to kill two birds with one stone. First, replace the failing HDD. Second, speed up her laptop. I searched online for cheap 240GB SSD’s and found one, the Kingston 240GB SSDNow V300 2.5. I replaced her hard drive, reloaded Windows 7 from scratch and proceeded to reload her applications (Photoshop, Office, Spore, Sony Vegas, etc.). Of course, you don’t have to reload from scratch but that is what I recommend, as long as you have the original installation media. If you do not have the original installation media, then you can use free cloning utilities such as EaseUS and CloneZilla, but I’ll save that for another day.
Once the operating system (Windows 7) was loaded along with all the applications, the improvement was immediate and noticeable. The 4 year old Dell 1545 laptop use to take 40 seconds to boot (from a clean newly created user profile). With the SSD, it takes 15 seconds….consistently. Not only that, virtually every application runs faster. Internet surfing is quicker. My daughter thinks she has a new laptop! There are other advantages too such as extending the power on your battery. Because SSD draws less power, you can expect up to 30 minutes or more battery life. Also, your laptop will be super quiet because there are no moving parts on an SSD compared to an HDD. So there you have it. If you want to extend the life of your laptop, then think about replacing the old hard disk drive with a solid state drive. You won’t regret it! The rest of this post offers some additional information that you need to be aware of if you plan on taking on this project.
Things you should know before replacing your HDD with an SSD
1. Most computers have SATA HDD’s in them; SATA comes in three revisions:
SATA I –150 Mb/s
SATA II – 300 Mb/s
SATA III – 600 Mb/s
One important thing to note is that no matter how fast your new SSD is, it will only be as fast as the SATA controller in your computer. Therefore, if your computer has a SATA I controller, then the fastest possible throughput you will get is 150 Mb/s. It is my opinion that if you have a SATA I controller in your computer, then it is not worth spending the money for an SSD. It is time to break the piggy bank and buy a new computer. To find out what SATA controller you have, you can use the HD Tune application that you may have used to analyze your hard disk drive.

2. SSD’s cost much more than HDD’s. For example, you can purchase an HDD with double the capacity (500GB) for about $50. In comparison, a 240 SSD will cost you anywhere between $100 – $150. You are getting half the disk space for more than double the cost. If you don’t need the extra disk space and would rather have the speed, then an SSD may be the right choice for you.
3. The failure rate is a little better with an SSD as opposed to an HDD because it doesn’t have any moving parts. In other words, it should last longer than an HDD. However, don’t let that fool you. Drives, whether SSD or HDD, will eventually fail. You should always backup your data.
4. Some SSD’s may be slightly thinner than your HDD. When this happens, you must use a spacer in order for the drive to properly sit in the drive bay. If you do not do this, there is a good chance that the SSD will move around inside the laptop and potentially disconnect or even get damaged.
5. Finally, for those of you who aren’t tech savvy, below are the steps to replacing your HDD with an SSD on your laptop. It is very easy. PLEASE don’t pay someone hundreds of dollars to do this!
Step 1 – Remove HDD from Laptop
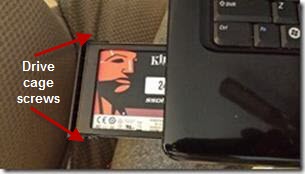
Unscrew (usually) two screws from the back (side) of your laptop. Pull out the HDD and then unscrew two more screws on the side of the drive cage.

Step 2 – Compare SSD and HDD width. Make sure they are same width before moving to Step 3. Notice below how the SSD is exactly the same width AFTER applying the spacer. The spacer usually comes with the SSD. If not, they are hard to find online. Make sure any SSD you purchase comes with a spacer which is sometimes referred to as an adapter. It makes the 7mm SSD 9.5mm in width. This is very important.

Step 3 – Apply SSD spacer (if needed)
The spacer is simply a square piece of plastic that fits on top of the SSD to make it fit in the drive cage. Peel off the stickers on the spacer and apply it to the SSD (see below).

Step 4 – Attach the SSD to the drive cage by screwing the two drive cage screws.
Step 5 – Insert the SSD drive all the way into your laptop and attach with the two remaining screws.
Step 6 – Insert your Windows or Linux installation CD and power up your laptop. Follow the installation wizard.
That’s it. It’s the easiest thing to do. Like I said earlier, this small investment made a huge difference in my youngest daughter’s 4 year old Dell 1545 Inspiron laptop to the point where she’ll definitely be able to keep using it at least until she gets to college in another two years. If this was helpful, share the love, give us a like or share this with your friends. Good luck!